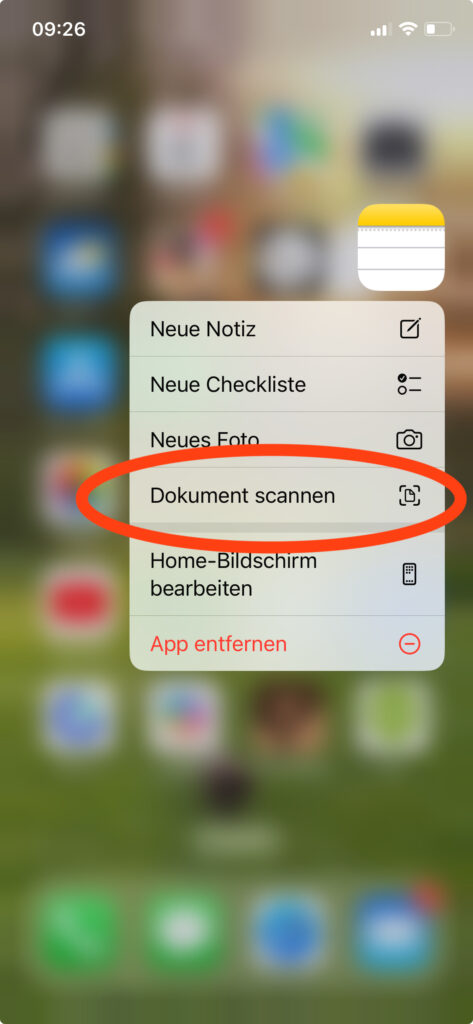
The iPhone is more than just a smartphone – it's also a powerful scanner that's always in your pocket. With built-in features, you can digitize documents without installing additional apps. In this article, we'll show you how to optimally use your iPhone for scanning and what free alternatives are available.
Scanning Documents with the iPhone Without Additional Apps
Apple has integrated powerful scanning functions directly into iOS. These are available in two standard apps: Notes and Files. Both offer high-quality scans that are perfect for personal and business use.
The built-in scanning functions offer:
- Automatic edge detection
- Perspective correction
- Color optimization
- Multi-page PDF creation
- OCR text recognition (from iOS 15)
Scanning with the "Notes" App
The Notes app is the fastest method to scan documents on the iPhone. Here's how it works:
Step-by-Step Guide:
- Open the Notes app on your iPhone
- Create a new note or open an existing one
- Tap the camera icon above the keyboard
- If the keyboard is not visible, display it to see the camera icon
- Select "Scan Documents"
- Position the document in the camera viewfinder
- The iPhone automatically detects edges and captures the scan
- Adjust the corners manually if needed
- Tap "Keep Scan"
- Repeat the process for additional pages
- Tap "Save" when finished
Additional features in the Notes app:
- Automatic or manual capture: Choose between automatic detection or manual trigger
- Color filters: Choose between color, grayscale, or black and white
- Multiple pages: Scan multi-page documents in one go
- Editing: Rotate, crop, or add annotations
- Sharing: Send scans directly via email, messages, or other apps
Scanning with the "Files" App
The Files app offers a similar scanning function as the Notes app but saves scans directly to your iCloud Drive or locally on the device.
How to scan with the Files app:
- Open the Files app
- Navigate to the folder where you want to save the scan
- Tap the three-dot menu (…) in the top right
- Select "Scan Documents"
- Position the document and scan as in the Notes app
- The scan is saved directly as a PDF in the selected folder
Advantages of the Files app:
- Direct storage in structured folders
- Automatic iCloud synchronization
- Easy access from Mac or iPad
- Integration into existing file structures
Free Alternatives and Additional Tips
In addition to built-in functions, there are free apps that offer additional features:
Adobe Scan (free)
- Advanced OCR functions
- Automatic form recognition
- Cloud integration with Adobe Document Cloud
- Editing and commenting on PDFs
Microsoft Office Lens (free with Microsoft account)
- Integration with OneDrive and OneNote
- Business card recognition
- Whiteboard mode for presentations
- Export to Word, PowerPoint, and PDF
Document Management and Sharing
After scanning, managing and sharing documents is important:
Organization Options:
- Folder structure: Create a logical folder structure in the Files app
- Tagging: Use tags for better discoverability
- Favorites: Mark important documents as favorites
- Naming convention: Use consistent file names
Sharing Options:
- Email: Direct sending as PDF attachment
- AirDrop: Quick transfer to other Apple devices
- Cloud services: Upload to Dropbox, Google Drive, or OneDrive
- Messages: Share via iMessage or WhatsApp
Additional Tips for Perfect Scans
To achieve the best scan quality, follow these tips:
Camera and Lighting:
- Clean lens: Clean the camera lens before scanning
- Good lighting: Scan in sufficient light, but avoid harsh shadows
- Use flash: Activate the flash in low light for even illumination
- Steady hand: Hold the iPhone steady or place it on a firm surface
Document Preparation:
- Flat document: Smooth out creases and folds before scanning
- Contrasting background: Place the document on a neutral, solid-colored surface
- Complete view: Ensure the entire document is in frame
- Right-angle alignment: Hold the iPhone parallel to the document
Using Guides:
- Activate grid: Use the camera grid lines for alignment
- Level: The level in the camera app helps with horizontal alignment
- Automatic detection: Let automatic edge detection do its work
Extended Use Cases
For Individuals:
- Digitization of receipts and warranty documents
- Scanning insurance documents
- Capturing contracts and important papers
- Archiving old family photos and documents
For Small Business Owners:
- Mobile invoice capturing
- Digitization of contracts at customer sites
- Scanning delivery notes and order documents
- Capturing business cards
Conclusion
The iPhone offers powerful, built-in scanning functions that are completely sufficient for most use cases. Key takeaways:
- No extra apps needed: Notes and Files offer everything you need
- High-quality results: Automatic optimization ensures professional scans
- Easy operation: Intuitive user interface for quick scanning
- Versatile applications: From personal receipts to business documents
- Free alternatives: Adobe Scan and Office Lens offer additional features
With the right techniques and a bit of practice, you'll transform your iPhone into a professional document scanner that's always ready. Try it out and optimize your document management!
